MSSQL 2005 이상 부터는 여러가지 부가 서비스들이 많이 추가되었습니다.
DBA 업무를 다루시는 분들이라면, 필요에 따라 SQL을 단일사용자 모드로 구동해야 하는 경우가 생길 수 있습니다.
상식적으로 단일사용자 모드로 띄우면, 단 한개의 연결을 허용해주기 때문에... 접속이 한개는 되어야죠.
그러나, 아무리 시퀄을 재시작해도 접속이 않될 때가 있습니다.
별짓을 다하고, 찾다보니 SQL이 스스로 하나의 연결을 물고 있어서, 외부 접속이 불가능한 상황 -_-???
며칠을 고생해서 확인한 결과, 레포팅 서비스를 구동시키고 있을 경우
이 레포팅 서비스가 내부 연결을 하나 만들어서 물어버리는 것으로 확인되었습니다.
단일 사용자 모드를 운용할 때, 접속이 되지 않는다면 레포팅 서비스를 중지시키고
접속하시면 잘 접속이 된답니다.
(단일사용자 모드인데, 내부 연결을 물어버리면 관리자는 죽으라는 말인가? XX한 M$ -_-;;;)
윈도우의 터미널 서버를 이용하는 경우, 해당 세션별 정보나 프로세스 정보
그러한 목록을 가지고 먼가 작업을 해야 하는경우.. 사용할 수 있는 간단한 래핑클래스 입니다.
class CWTSSession 클래스의 경우는 해당 세션 ID를 알고 있을 경우 세션의 디테일한 정보를 읽어 오는 클래스이죠.
클래스의 내부 멤버를 보시면 어떤 정보를 열거하는지 바로 확인이 가능합니다.
class CWTSBase 위 클래스는 어떤 세션이 존재하는지, 어떤 서버가 존재하는지, 프로세스 목록은 어떤게 있는지
등등을 열거해주는 기능을 제공해줍니다.
[-] Collapse
#include <WtsApi32.h>
class CWTSSession
{
public:
CWTSSession();
CWTSSession(HANDLE hWTS, DWORD SessionID);
~CWTSSession();
세션 아이디를 알고 있을 경우, 해당 세션의 세부정보를 읽어오는 샘플 CWTSSession ws(WTS_CURRENT_SERVER_HANDLE, 세션아이디);
모든 세션에 걸친 프로세스 목록을 읽어오는 샘플 CWTSBase wts;
DWORD count;
PWTS_PROCESS_INFO info;
wts.EnumProcesses(info, &count);
어떤 세션이 존재하는지, 세션 목록 정보를 읽어오는 샘플 CWTSBase wts;
DWORD count;
PWTS_SESSION_INFO info;
wts.EnumProcesses(info, &count);
현재 나의 프로그램이 어떤 세션에 속해있는지를 판단하는 샘플 DWORD PID = GetCurrentProcessId();
DWORD SID = 9999999;
if(ProcessIdToSessionId(PID, &SID))
{
CWTSSession ws(WTS_CURRENT_SERVER_HANDLE, SID);
printf("%s\n", ws.IPAddress);
printf("%s\n", ws.ClientName);
printf("%s\n", ws.DomainName);
printf("%s\n", ws.UserName);
printf("%s\n", ws.WinStation);
}
지정된 세션에 동일한 프로세스가 있을 경우, 해당 세션의 특정 프로세스에 메시지 보내기 오직 하나의 프로그램이 동작하도록 할경우를 제외한 하나의 세션당 하나의 프로그래만 구동되도록 작성해야 할경우.. 사용한 샘플입니다. BOOL CALLBACK CROWBACK_WNDENUMPROC(HWND hWnd, LPARAM lp)
{
DWORD target = lp;
DWORD pid = 9999999;
GetWindowThreadProcessId(hWnd, &pid);
if(pid == target)
{
char caption[512] = {0};
::GetWindowText(hWnd, caption, 512);
if(strstr(caption, "Alert Management"))
{
::PostMessage(hWnd, 0x9999, 0, 0);
return FALSE;
}
}
네트워크라는 개념이 생성되면서, 여러가지 계층간 통신이 생겨났다.
일반적으로 어플리케이션 개발자들이 사용하는 통신은 최상위 계층을 다루게 되며..
주로 소켓통신, 혹은 파이프와 같은 것을 이용하여 로컬 프로세스간 혹은 원격지 프로세스간에
통신을 하게된다.
여기서는 메시지를 주고받은 통신에서, 데이터를 공유하는 것을 통털어... 알고 있는것만 정리한다. -0-;;;
모르는 것을 어떻게 하나 ^^;;; (누가좀..)
이 계통에 들어선지 시간이 좀 흘럿지만, 참으로 다양한 방식이 존재하고..
공부해야할 것도 너무 많다.. -0-;;;
1. SOCKET - 통신
통신 프로그램을 짜면 가장 먼저 접하는 것이 소켓이다. 하위호환 덕택에 아직도 명맥을 유지하는 BSD 모델과
winsock으로 불리우는 2가지 모델을 윈도우에서 제공해준다.
서버/클라이언트 모델로 제공되며, TCP/UDP 이렇게 상위 2가지를 주로 사용한다.
(이건 머, 어떻게 심플하게 설명할 방법이 없다... 책사서 봐야지 ㅋ~)
2. ATOM - 공유
시스템에서 제공하는 테이블을 이용하여, 문자열 데이터를 공유할 수 있도록 제공해준다.
ATOM 이라고 불리우는 2바이트 숫자를 키 값으로 이용하여 255바이트까지의 문자열을 해당 시스템의 테이블에
저장하고, 가져다 쓸 수 있다. 사용방법이 너무 간단하고, 윈도우 95까지도 지원한다.
함수도 아래의 6개가 다이고, 그나마 로컬과 글로벌을 구분하기 위한 정도뿐이다.
9번 DDE 섹션을 보면, ATOM과 SendMessage 를 이용하여, 어떻게 데이터 통신을 할 수 있는지
다양함 샘플을 보여준다.
Atoms
An atom table is a system-defined table that stores strings and corresponding identifiers. An application places a string in an atom table and receives a 16-bit integer, called an atom, that can be used to access the string. A string that has been placed in an atom table is called an atom name.
Overviews
About Atom Tables
This section discusses atom tables.
Using Atoms
This topic discusses how to use atoms in applications.
Functions
AddAtom
The AddAtom function adds a character string to the local atom table and returns a unique value (an atom) identifying the string.
DeleteAtom
The DeleteAtom function decrements the reference count of a local string atom. If the atom's reference count is reduced to zero, DeleteAtom removes the string associated with the atom from the local atom table.
FindAtom
The FindAtom function searches the local atom table for the specified character string and retrieves the atom associated with that string.
GetAtomName
The GetAtomName function retrieves a copy of the character string associated with the specified local atom.
GlobalAddAtom
The GlobalAddAtom function adds a character string to the global atom table and returns a unique value (an atom) identifying the string.
GlobalDeleteAtom
The GlobalDeleteAtom function decrements the reference count of a global string atom. If the atom's reference count reaches zero, GlobalDeleteAtom removes the string associated with the atom from the global atom table.
GlobalFindAtom
The GlobalFindAtom function searches the global atom table for the specified character string and retrieves the global atom associated with that string.
GlobalGetAtomName
The GlobalGetAtomName function retrieves a copy of the character string associated with the specified global atom.
InitAtomTable
The InitAtomTable function initializes the local atom table and sets the number of hash buckets to the specified size.
Macros
MAKEINTATOM
The MAKEINTATOM macro converts the specified atom into a string, so it can be passed to functions which accept either atoms or strings.
3. PIPE - 통신
로컬머신, 혹은 로컬 네트웍 그룹내에서 사용이 가능한 통신 방식이다. 소켓보다 조금 들 복잡하지만 소켓처럼
정밀하게 제어하기는 조금 쉽지 않다.
이름 있는 파이프(양방향통신)과, 이름 없는 파이프(단방향통신)을 지원한다.
fResult = GetMailslotInfo( hSlot, // mailslot handle
(LPDWORD) NULL, // no maximum message size
&cbMessage, // size of next message
&cMessage, // number of messages
(LPDWORD) NULL); // no read time-out
if (!fResult)
{
printf("GetMailslotInfo failed with %d.\n", GetLastError());
return FALSE;
}
if (cbMessage == MAILSLOT_NO_MESSAGE)
{
printf("Waiting for a message...\n");
return TRUE;
}
cAllMessages = cMessage;
while (cMessage != 0) // retrieve all messages
{
// Create a message-number string.
_tprintf(TEXT("Contents of the mailslot: %s\n"), lpszBuffer);
GlobalFree((HGLOBAL) lpszBuffer);
fResult = GetMailslotInfo(hSlot, // mailslot handle
(LPDWORD) NULL, // no maximum message size
&cbMessage, // size of next message
&cMessage, // number of messages
(LPDWORD) NULL); // no read time-out
if (hFile == INVALID_HANDLE_VALUE)
{
printf("CreateFile failed with %d.\n", GetLastError());
return FALSE;
}
WriteSlot(hFile, TEXT("Message one for mailslot."));
WriteSlot(hFile, TEXT("Message two for mailslot."));
Sleep(5000);
WriteSlot(hFile, TEXT("Message three for mailslot."));
CloseHandle(hFile);
return TRUE;
}
5. SendMessage, PostMessage - 통신
윈도우가 존재한다는 범위내에서만 사용가능한 통신이며, WPARAM, LPARAM 에 해당하는 두개의 정수형 타입 데이터의
전송이 가능하다. 큐잉을 보장해주지만, 윈도가 있어야한다는 제약이 있다.
6. WM_COPYDATA - 통신
5번과 마찬가지로 윈도우의 메시지를 이용한 통신 방식이다. 매우 사용하기 쉽다. 윈도우즈 메시지 기반이기 때문에,
메시지 펌프 처리를 해줘야한다. 메시지 통신의 빈도가 낮고, 빨리 구현하는 것이 우선이라면 이 방법이 좋을 수 있다.
다만 메시지를 받는 쪽이 윈도우 핸들이 가지고 있어야 한다.
COPYDATASTRUCT 의 구조는 아래와 같습니다. (Winuser.h 에 선언되어 있음)
typedef struct tagCOPYDATASTRUCT {
ULONG_PTR dwData; //전송되는 데이타의 구분자 용도
DWORD cbData; // 전송되는 데이타의 크기 (바이트 단위)
PVOID lpData;//실제 전송되는 데이타
} COPYDATASTRUCT, *PCOPYDATASTRUCT;
보낼때는 ::SendMessage(WM_COPYDATA, 0, (LPVOID)내 데이터주소);
이렇게 그냥 메시지 방식으로 전송하면 된다.
받을 때는 WM_COPYDATA 이벤트의 핸들러의 등록한 다음에..
해당 핸들러를 다음과 같이 사용하면 된다.
혹시나 WM_COPYDATA 메시지를 PostMessage 로 전송할 경우에 대한 별도의 코멘트는 없는데..
어떤 문제가 생길지는 시간나면 한번 테스트를 해보세요..
7. Memory Mapped File - 공유
Memory Mapped File도 프로세스 간 통신에 이용할 수 있다. 다른 IPC들이 Memory Mapped File를 이용해서 구현되므로,
속도가 중요하다면, Memory Mapped File이 가장 나은 선택이다.
대량의 데이터를 다룰 때 주로 사용되지만, 매핑된 메모리를 블럭단위로 사용하게 되므로, 상호 액세스에 대한 규정을
잘 만들어 관리해야 한다.
8. DLL Shared Sections - 공유
DLL을 만들고 공유 영역을 설정하여 데이터를 공유하는 방식이다. 일단 DLL을 작성해야 하기 때문에 간단한 통신을 위하여
이러한 것을 만드는 것은 조금 비효율 적이라고도 할 수 있다.
또한 윈도우에 같은 dll 이 있다면, 경로가 서로 달라 각각의 dll을 로드하게 되면 이러한 것도 무용지물이다.
9. DDE, NetDDE - 통신
자료를 좀 찾아보니, DDE는 SendMessage 와 ATOM을 조합하여, 시스템 ATOM 테이블을 이용한 데이터 통신이란다.
데이터가 있을 경우는 공유메모리를 생성하여, 해당 메모리 주소를 전달하는 방식이고, 이러한 조합을 몇가지 내부적인
메시지로 감싸서 사용자가 쉽게 사용할 수 있도록 해결해준다.
Initiating a Conversation
To initiate a Dynamic Data Exchange (DDE) conversation, the client sends a WM_DDE_INITIATE message. Usually, the client broadcasts this message by calling SendMessage, with –1 as the first parameter. If the application already has the window handle to the server application, it can send the message directly to that window. The client prepares atoms for the application name and topic name by calling GlobalAddAtom. The client can request conversations with any potential server application and for any potential topic by supplying NULL (wildcard) atoms for the application and topic.
The following example illustrates how the client initiates a conversation, where both the application and topic are specified.
fInInitiate = TRUE;
SendMessage((HWND) HWND_BROADCAST, // broadcasts message
WM_DDE_INITIATE, // initiates conversation
(WPARAM) hwndClientDDE, // handle to client DDE window
MAKELONG(atomApplication, // application-name atom
atomTopic)); // topic-name atom
fInInitiate = FALSE;
if (atomApplication != NULL)
GlobalDeleteAtom(atomApplication);
if (atomTopic != NULL)
GlobalDeleteAtom(atomTopic);
Note If your application uses NULL atoms, you need not use the GlobalAddAtom and GlobalDeleteAtom functions. In this example, the client application creates two global atoms containing the name of the server and the name of the topic, respectively.
The client application sends a WM_DDE_INITIATE message with these two atoms in the lParam parameter of the message. In the call to the SendMessage function, the special window handle –1 directs the system to send this message to all other active applications. SendMessage does not return to the client application until all applications that receive the message have, in turn, returned control to the system. This means that all WM_DDE_ACK messages sent in reply by the server applications are guaranteed to have been processed by the client by the time the SendMessage call has returned.
After SendMessage returns, the client application deletes the global atoms.
Server applications respond according to the logic illustrated in the following diagram.
To acknowledge one or more topics, the server must create atoms for each conversation (requiring duplicate application-name atoms if there are multiple topics) and send a WM_DDE_ACK message for each conversation, as illustrated in the following example.
When a server responds with a WM_DDE_ACK message, the client application should save a handle to the server window. The client receiving the handle as the wParam parameter of the WM_DDE_ACK message then sends all subsequent DDE messages to the server window this handle identifies.
If your client application uses a NULL atom for the application name or topic name, expect the application to receive acknowledgments from more than one server application. Multiple acknowledgements can also come from multiple instances of a DDE server, even if your client application does not NULL use atoms. A server should always use a unique window for each conversation. The window procedure in the client application can use a handle to the server window (provided as the lParam parameter of WM_DDE_INITIATE) to track multiple conversations. This allows a single client window to process several conversations without needing to terminate and reconnect with a new client window for each conversation.
Transferring a Single Item
Once a DDE conversation has been established, the client can either retrieve the value of a data item from the server by issuing the WM_DDE_REQUEST message, or submit a data-item value to the server by issuing WM_DDE_POKE.
To retrieve an item from the server, the client sends the server a WM_DDE_REQUEST message specifying the item and format to retrieve, as shown in the following example.
if ((atomItem = GlobalAddAtom(szItemName)) != 0)
{
if (!PostMessage(hwndServerDDE,
WM_DDE_REQUEST,
(WPARAM) hwndClientDDE,
PackDDElParam(WM_DDE_REQUEST, CF_TEXT, atomItem)))
{
GlobalDeleteAtom(atomItem);
}
}
if (atomItem == 0)
{
// Handle errors.
}
In this example, the client specifies the clipboard format CF_TEXT as the preferred format for the requested data item.
The receiver (server) of the WM_DDE_REQUEST message typically must delete the item atom, but if the PostMessage call fails, the client must delete the atom.
If the server has access to the requested item and can render it in the requested format, the server copies the item value as a shared memory object and sends the client a WM_DDE_DATA message, as illustrated in the following example.
// Allocate the size of the DDE data header, plus the data: a
// string,<CR><LF><NULL>. The byte for the string's terminating
// null character is counted by DDEDATA.Value[1].
if (!(lpData = (DDEDATA FAR*) GlobalLock(hData)))
{
GlobalFree(hData);
return;
}
lpData->cfFormat = CF_TEXT;
hResult = StringCchCopy((LPSTR) lpData->Value, *pcch +1, (LPCSTR) szItemValue); // copies value to be sent
if (FAILED(hResult))
{
// TODO: Write error handler.
return;
}
// Each line of CF_TEXT data is terminated by CR/LF.
hResult = StringCchCat((LPSTR) lpData->Value, *pcch + 3, (LPCSTR) "\r\n");
if (FAILED(hResult)
{
// TODO: Write error handler.
return;
}
GlobalUnlock(hData);
if ((atomItem = GlobalAddAtom((LPSTR) szItemName)) != 0)
{
lParam = PackDDElParam(WM_DDE_ACK, (UINT) hData, atomItem);
if (!PostMessage(hwndClientDDE,
WM_DDE_DATA,
(WPARAM) hwndServerDDE,
lParam))
{
GlobalFree(hData);
GlobalDeleteAtom(atomItem);
FreeDDElParam(WM_DDE_ACK, lParam);
}
}
if (atomItem == 0)
{
// Handle errors.
}
In this example, the server application allocates a memory object to contain the data item. The data object is initialized as a DDEDATA structure.
The server application then sets the cfFormat member of the structure to CF_TEXT to inform the client application that the data is in text format. The client responds by copying the value of the requested data into the Value member of the DDEDATA structure. After the server has filled the data object, the server unlocks the data and creates a global atom containing the name of the data item.
Finally, the server issues the WM_DDE_DATA message by calling PostMessage. The handle to the data object and the atom containing the item name are packed into the lParam parameter of the message by the PackDDElParam function.
If PostMessage fails, the server must use the FreeDDElParam function to free the packed lParam parameter. The server must also free the packed lParam parameter for the WM_DDE_REQUEST message it received.
If the server cannot satisfy the request, it sends a negative WM_DDE_ACK message to the client, as shown in the following example.
Upon receiving a WM_DDE_DATA message, the client processes the data-item value as appropriate. Then, if the fAckReq member pointed to in the WM_DDE_DATA message is 1, the client must send the server a positive WM_DDE_ACK message, as shown in the following example.
bRelease = lpDDEData->fRelease;
GlobalUnlock(hData);
if (bRelease)
GlobalFree(hData);
In this example, the client examines the format of the data. If the format is not CF_TEXT (or if the client cannot lock the memory for the data), the client sends a negative WM_DDE_ACK message to indicate that it cannot process the data. If the client cannot lock a data handle because the handle contains the fAckReq member, the client should not send a negative WM_DDE_ACK message. Instead, the client should terminate the conversation.
If a client sends a negative acknowledgment in response to a WM_DDE_DATA message, the server is responsible for freeing the memory (but not the lParam parameter) referenced by the WM_DDE_DATA message associated with the negative acknowledgment.
If it can process the data, the client examines the fAckReq member of the DDEDATA structure to determine whether the server requested that it be informed that the client received and processed the data successfully. If the server did request this information, the client sends the server a positive WM_DDE_ACK message.
Because unlocking data invalidates the pointer to the data, the client saves the value of the fRelease member before unlocking the data object. After saving the value, the client then examines it to determine whether the server application requested the client to free the memory containing the data; the client acts accordingly.
Upon receiving a negative WM_DDE_ACK message, the client can ask for the same item value again, specifying a different clipboard format. Typically, a client will first ask for the most complex format it can support, then step down if necessary through progressively simpler formats until it finds one the server can provide.
If the server supports the Formats item of the system topic, the client can determine once what clipboard formats the server supports, instead of determining them each time the client requests an item.
Submitting an Item to the Server
The client may send an item value to the server by using the WM_DDE_POKE message. The client renders the item to be sent and sends the WM_DDE_POKE message, as illustrated in the following example.
if (!(lpPokeData = (DDEPOKE *) GlobalLock(hPokeData)))
{
GlobalFree(hPokeData);
return;
}
lpPokeData->fRelease = TRUE;
lpPokeData->cfFormat = CF_TEXT;
hResult = StringCchCopy((LPSTR) lpPokeData->Value, *pcch +1, (LPCSTR) szValue); // copies value to be sent
if (FAILED(hResult))
{
// TODO: Write error handler.
return;
}
// Each line of CF_TEXT data is terminated by CR/LF.
hResult = StringCchCat((LPSTR) lpPokeData->Value, *pcch + 3, (LPCSTR) "\r\n");
if (FAILED(hResult)
{
// TODO: Write error handler.
return;
}
GlobalUnlock(hPokeData);
if ((atomItem = GlobalAddAtom((LPSTR) szItem)) != 0)
{
Note Sending data by using a WM_DDE_POKE message is essentially the same as sending it by using WM_DDE_DATA, except that WM_DDE_POKE is sent from the client to the server.
If the server is able to accept the data-item value in the format rendered by the client, the server processes the item value as appropriate and sends the client a positive WM_DDE_ACK message. If it is unable to process the item value, because of its format or for other reasons, the server sends the client a negative WM_DDE_ACK message.
In this example, the server calls GlobalGetAtomName to retrieve the name of the item the client sent. The server then determines whether it supports the item and whether the item is rendered in the correct format (that is, CF_TEXT). If the item is not supported and not rendered in the correct format, or if the server cannot lock the memory for the data, the server sends a negative acknowledgment back to the client application. Note that in this case, sending a negative acknowledgment is correct because WM_DDE_POKE messages are always assumed to have the fAckReq member set. The server should ignore the member.
If a server sends a negative acknowledgment in response to a WM_DDE_POKE message, the client is responsible for freeing the memory (but not the lParam parameter) referenced by the WM_DDE_POKE message associated with the negative acknowledgment.
Establishing a Permanent Data Link
A client application can use DDE to establish a link to an item in a server application. After such a link is established, the server sends periodic updates of the linked item to the client, typically, whenever the value of the item changes. Thus, a permanent data stream is established between the two applications; this data stream remains in place until it is explicitly disconnected.
Initiating a Data Link
The client initiates a data link by posting a WM_DDE_ADVISE message, as shown in the following example.
if (!(hOptions = GlobalAlloc(GMEM_MOVEABLE,
sizeof(DDEADVISE))))
return;
if (!(lpOptions = (DDEADVISE FAR*) GlobalLock(hOptions)))
{
GlobalFree(hOptions);
return;
}
In this example, the client application sets the fDeferUpd flag of the WM_DDE_ADVISE message to FALSE. This directs the server application to send the data to the client whenever the data changes.
If the server is unable to service the WM_DDE_ADVISE request, it sends the client a negative WM_DDE_ACK message. But if the server has access to the item and can render it in the requested format, the server notes the new link (recalling the flags specified in the hOptions parameter) and sends the client a positive WM_DDE_ACK message. From then on, until the client issues a matching WM_DDE_UNADVISE message, the server sends the new data to the client every time the value of the item changes in the server.
The WM_DDE_ADVISE message establishes the format of the data to be exchanged during the link. If the client attempts to establish another link with the same item but is using a different data format, the server can choose to reject the second data format or attempt to support it. If a warm link has been established for any data item, the server can support only one data format at a time. This is because the WM_DDE_DATA message for a warm link has a NULL data handle, which otherwise contains the format information. Thus, a server must reject all warm links for an item already linked, and must reject all links for an item that has warm links. Another interpretation may be that the server changes the format and the hot or warm state of a link when a second link is requested for the same data item.
In general, client applications should not attempt to establish more than one link at a time for a data item.
Initiating a Data Link with the Paste Link Command
Applications that support hot or warm data links typically support a registered clipboard format named Link. When associated with the application's Copy and Paste Link commands, this clipboard format enables the user to establish DDE conversations between applications simply by copying a data item in the server application and pasting it into the client application.
A server application supports the Link clipboard format by placing in the clipboard a string containing the application, topic, and item names when the user chooses the Copy command from the Edit menu. Following is the standard Link format:
application\0topic\0item\0\0
A single null character separates the names, and two null characters terminate the entire string.
Both the client and server applications must register the Link clipboard format, as shown:
cfLink = RegisterClipboardFormat("Link");
A client application supports the Link clipboard format by means of a Paste Link command on its Edit menu. When the user chooses this command, the client application parses the application, topic, and item names from the Link-format clipboard data. Using these names, the client application initiates a conversation for the application and topic, if such a conversation does not already exist. The client application then sends a WM_DDE_ADVISE message to the server application, specifying the item name contained in the Link-format clipboard data.
Following is an example of a client application's response when the user chooses the Paste Link command.
if (hwndServerDDE =
FindServerGivenAppTopic(szApplication, szTopic))
{
// App/topic conversation is already started.
if (DoesAdviseAlreadyExist(hwndServerDDE, szItem))
{
MessageBox(hwndMain,
"Advisory already established",
"Client", MB_ICONEXCLAMATION | MB_OK);
}
else SendAdvise(hwndClientDDE, hwndServerDDE, szItem);
}
else
{
// Client must initiate a new conversation first.
SendInitiate(szApplication, szTopic);
if (hwndServerDDE =
FindServerGivenAppTopic(szApplication,
szTopic))
{
SendAdvise(hwndClientDDE, hwndServerDDE, szItem);
}
}
}
return;
}
In this example, the client application opens the clipboard and determines whether it contains data in the Link format (that is, cfLink) it had previously registered. If not, or if it cannot lock the data in the clipboard, the client returns.
After the client application retrieves a pointer to the clipboard data, it parses the data to extract the application, topic, and item names.
The client application determines whether a conversation on the topic already exists between it and the server application. If a conversation does exist, the client checks whether a link already exists for the data item. If such a link exists, the client displays a message box to the user; otherwise, it calls its own SendAdvise function to send a WM_DDE_ADVISE message to the server for the item.
If a conversation on the topic does not already exist between the client and the server, the client first calls its own SendInitiate function to broadcast the WM_DDE_INITIATE message to request a conversation and, second, calls its own FindServerGivenAppTopic function to establish the conversation with the window that responds on behalf of the server application. After the conversation has begun, the client application calls SendAdvise to request the link.
Notifying the Client that Data Has Changed
When the client establishes a link by using the WM_DDE_ADVISE message, with the fDeferUpd member not set (that is, equal to zero) in the DDEDATA structure, the client has requested the server send the data item each time the item's value changes. In such cases, the server renders the new value of the data item in the previously specified format and sends the client a WM_DDE_DATA message, as shown in the following example.
// Allocate the size of a DDE data header, plus data (a string),
// plus a <CR><LF><NULL>
size_t* pcch;
HRESULT hResult;
hResult = StringCchLength(szItemValue,STRSAFE_MAX_CCH, pcch);
if (FAILED(hResult))
{
// TODO: Write error handler.
return;
}
if (!(hData = GlobalAlloc(GMEM_MOVEABLE,
sizeof(DDEDATA) + *pcch + 3)))
{
return;
}
if (!(lpData = (DDEDATA FAR*) GlobalLock(hData)))
{
GlobalFree(hData);
return;
}
lpData->fAckReq = bAckRequest; // as in original WM_DDE_ADVISE
lpData->cfFormat = CF_TEXT;
hResult = StringCchCopy(lpData->Value, *pcch +1, szItemValue); // copies value to be sent
if (FAILED(hResult))
{
// TODO: Write error handler.
return;
}
// add CR/LF for CF_TEXT format
hResult = StringCchCat(lpData->Value, *pcch + 3, "\r\n");
if (FAILED(hResult))
{
// TODO: Write error handler.
return;
}
GlobalUnlock(hData);
if ((atomItem = GlobalAddAtom(szItemName)) != 0)
{
if (!PostMessage(hwndClientDDE,
WM_DDE_DATA,
(WPARAM) hwndServerDDE,
PackDDElParam(WM_DDE_DATA, (UINT) hData, atomItem)))
{
GlobalFree(hData);
GlobalDeleteAtom(atomItem);
FreeDDElParam(WM_DDE_DATA, lParam);
}
}
if (atomItem == 0)
{
// Handle errors.
}
In this example, the client processes the item value as appropriate. If the fAckReq flag for the item is set, the client sends the server a positive WM_DDE_ACK message.
When the client establishes the link, with the fDeferUpd member set (that is, equal to 1), the client has requested that only a notification, not the data itself, be sent each time the data changes. In such cases, when the item value changes, the server does not render the value but simply sends the client a WM_DDE_DATA message with a null data handle, as illustrated in the following example.
if (bDeferUpd) // check whether flag was set in WM_DDE_ADVISE
{
if ((atomItem = GlobalAddAtom(szItemName)) != 0)
{
if (!PostMessage(hwndClientDDE,
WM_DDE_DATA,
(WPARAM) hwndServerDDE,
PackDDElParam(WM_DDE_DATA, 0,
atomItem))) // NULL data
{
GlobalDeleteAtom(atomItem);
FreeDDElParam(WM_DDE_DATA, lParam);
}
}
}
if (atomItem == 0)
{
// Handle errors.
}
As necessary, the client can request the latest value of the data item by issuing a normal WM_DDE_REQUEST message, or it can simply ignore the notice from the server that the data has changed. In either case, if fAckReq is equal to 1, the client is expected to send a positive WM_DDE_ACK message to the server.
Terminating a Data Link
If the client requests that a specific data link be terminated, the client sends the server a WM_DDE_UNADVISE message, as shown in the following example.
The server checks whether the client currently has a link to the specific item in this conversation. If a link exists, the server sends the client a positive WM_DDE_ACK message; the server is then no longer required to send updates about the item. If no link exists, the server sends the client a negative WM_DDE_ACK message.
The WM_DDE_UNADVISE message specifies a data format. A format of zero informs the server to stop all links for the specified item, even if several hot links are established and each uses a different format.
To terminate all links for a conversation, the client application sends the server a WM_DDE_UNADVISE message with a null item atom. The server determines whether the conversation has at least one link currently established. If a link exists, the server sends the client a positive WM_DDE_ACK message; the server then no longer has to send any updates in the conversation. If no link exists, the server sends the client a negative WM_DDE_ACK message.
Carrying Out Commands in a Server Application
Applications can use the WM_DDE_EXECUTE message to cause a certain command or series of commands to be carried out in another application. To do this, the client sends the server a WM_DDE_EXECUTE message containing a handle to a command string, as shown in the following example.
HRESULT hResult;
if (!(hCommand = GlobalAlloc(GMEM_MOVEABLE,
sizeof(szCommandString) + 1)))
{
return;
}
if (!(lpCommand = GlobalLock(hCommand)))
{
GlobalFree(hCommand);
return;
}
In this example, the server attempts to carry out the specified command string. If it succeeds, the server sends the client a positive WM_DDE_ACK message; otherwise, it sends a negative WM_DDE_ACK message. This WM_DDE_ACK message reuses the hCommand handle passed in the original WM_DDE_EXECUTE message.
If the client's command execution string requests that the server terminate, the server should respond by sending a positive WM_DDE_ACK message and then post a WM_DDE_TERMINATE message before terminating. All other commands sent with a WM_DDE_EXECUTE message should be executed synchronously; that is, the server should send a WM_DDE_ACK message only after successfully completing the command.
Terminating a Conversation
Either the client or the server can issue a WM_DDE_TERMINATE message to terminate a conversation at any time. Similarly, both the client and server applications should be prepared to receive this message at any time. An application must terminate all of its conversations before shutting down.
In the following example, the application terminating the conversation posts a WM_DDE_TERMINATE message.
This informs the other application that the sending application will send no further messages and the recipient can close its window. The recipient is expected in all cases to respond promptly by sending a WM_DDE_TERMINATE message. The recipient must not send a negative, busy, or positive WM_DDE_ACK message.
After an application has sent the WM_DDE_TERMINATE message to the partner in a DDE conversation, it must not respond to messages from that partner, since the partner might have destroyed the window to which the response would be sent.
If an application receives a DDE message other than WM_DDE_TERMINATE after it has posted WM_DDE_TERMINATE, it should free all objects associated with the received messages except the data handles for WM_DDE_DATA or WM_DDE_POKE messages that do not have the fRelease member set.
When an application is about to terminate, it should end all active DDE conversations before completing processing of the WM_DESTROY message. However, if an application does not end its active DDE conversations, the system will terminate any DDE conversations associated with a window when the window is destroyed. The following example shows how a server application terminates all DDE conversations.
// 먼저 IinternetSecurityManager 인터페이스를 초기화한다. hr = CoCreateInstance(CLSID_InternetSecurityManager, NULL, CLSCTX_ALL, IID_IInternetSecurityManager, (void**)&pSecurityMgr); if (hr != S_OK) { CoUninitialize(); return; }
// 다음으로 IinternetZoneManager 인터페이스를 초기화한다. hr = CoCreateInstance(CLSID_InternetZoneManager, NULL, CLSCTX_ALL, IID_IInternetZoneManager, (void**)&pZoneMgr); if (hr != S_OK) { CoUninitialize(); return; } dwEnum = 0;
// Zone Enumerator를 초기화한다. pZoneMgr->CreateZoneEnumerator(&dwEnum, &dwZoneCount, 0);
// 2번 존에 대한 정보를 얻는다. 2번 존이 신뢰할 수 있는 영역 존이다. pZoneMgr->GetZoneAt( dwEnum, nLevel, &dwZone); pZoneMgr->GetZoneAttributes(dwZone, &zoneAttr);
// 지금 예제는 보통의 HTTP 사이트를 등록하는 것이기 때문에 HTTPS만을 등록해야 하는 제약 조건을 없앤다. if (zoneAttr.dwFlags &ZAFLAGS_REQUIRE_VERIFICATION) { // 서버 확인 부분을 뺀다. zoneAttr.dwFlags = (zoneAttr.dwFlags & ~(ZAFLAGS_REQUIRE_VERIFICATION)); }
// 현재 보안 설정이 낮음이 아니면 낮음으로 설정한다. if (zoneAttr.dwTemplateCurrentLevel != 0x10000) { zoneAttr.dwTemplateCurrentLevel = 0x10000; zoneAttr.dwTemplateMinLevel = 0x10000; } pZoneMgr->SetZoneAttributes(dwZone, &zoneAttr);
// 등록 사이트 CString strDomain = "http://www.devpia.com";
// 이 값을 유니코드로 변경한다. BSTR bDomain = strDomain.AllocSysString();
// IInternetSecurity 인터페이스의 SetZoneMapping 함수를 이용해 등록한다. hr = pSecurityMgr->SetZoneMapping(nLevel, bDomain, SZM_CREATE);
if (hr == E_ACCESSDENIED) // 존 설정이 서버 확인을 필요로 하는 곳이면 { ::MessageBox(NULL, "등록하려는 영역이 서버 확인이 필요한 것으로 설정되어 있습니다.", "영역 추가 에러", MB_OK); } else if (hr == ERROR_FILE_EXISTS) // 이미 다른 영역으로 등록된 것이면 { ::MessageBox(NULL, "등록하려는 주소가 이미 다른 영역으로 설정되어 있습니다.", "영역 추가 에러", MB_OK); }
::SysFreeString(bDomain);
if (dwEnum != 0) pZoneMgr->DestroyZoneEnumerator(dwEnum);
회사에서 업무를 수행하다 보니 나오게된 결과물 입니다. 유틸리티성으로 만들게된 것인데
상업적 사용만 아니라면 공개해도 문제 없다는 답변을 받고 올려봅니다.
(상업적 사용이란, 회사에서 가공없이 업무에 사용하는것은 상관없습니다만, 재가공 하여 판매하는 것을 말함)
(개인적인 욕심은 혹시 사용해보시고, 문제점이나 추가 기능에 대한 요구등을 얻을 수 있을까 하는 목적도 ㅎㅎ;;;)
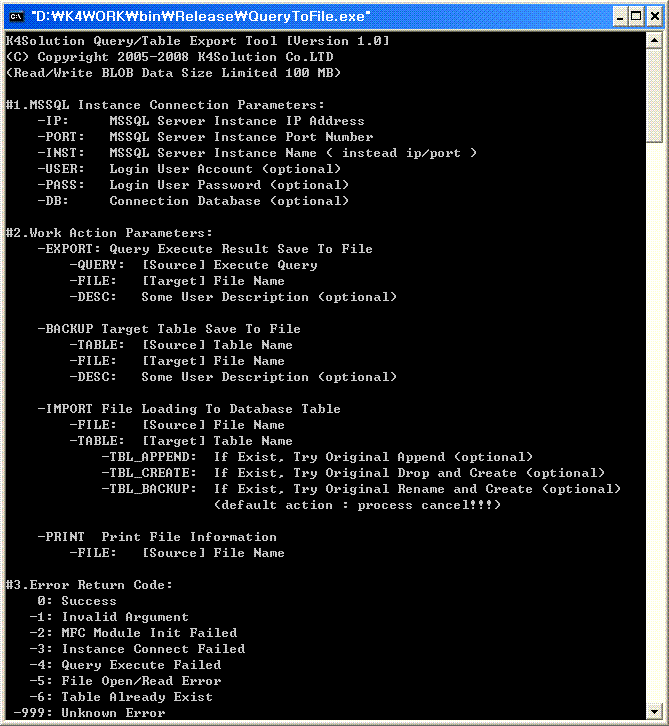
제목 그대로 테이블만 별도 파일로 떨구거나, 혹은 수행한 쿼리문의 결과를 파일로 저장하는 기능
그리고, 반대로 저장된 파일을 다시 테이블로 넣는 기능을 제공하는 유틸리티입니다.
(파일로 쓰거나, 테이블에 로딩하는 속도는 select into 와 비교했을 때 뒤지지 않습니다.)
1. 알려진 사용상의 단점
A. 위의 그림에서 보신바와 같이 테이블내에 혹은 수행된 쿼리 결과내에 여러개의 BLOB 형식의 데이터가 위치와 상관없이
삽입되어 있더라도 동작 수행에 문제는 없으며, 단 한 컬럼당 BLOB 데이터의 크기가 100MB 정도까지만 지원되도록
하는 제한 사항이 있습니다. (이는 일부러 제한을 둔것이 아니고, 아직까지 해결하지 못한 문제랍니다. -_-;;;)
B. 테이블을 백업하였을 경우는 테이블의 자료구조가 100% 정확하게 파일에 설정되지만, 쿼리의 수행결과를 파일로 저장할 경우는
select into 했을 때와 마찬가지로 호완가능한 구조로 저장되기 때문에, 테이블에 로딩했을 때 원본과 데이터 타입 일부가 다를 수
있습니다. 예를 들면 smallmony 타입을 쿼리 결과로 파일에 저장했을 경우 decimal 로 저장됩니다.
혹은 sysname 타입을 저장했을 경우는 nvarchar 로 저장되죠.
백업 기능을 이용 -BACKUP -TABLE sysindexes 로 저장한 것과
익스포트 기능을 이용 -EXPORT -QUERY "select * from sysindexes" 로 저장한 경우 테이블에 저장된 결과물은 동일하지만
테이블의 자료형이 일부 다를 수 있습니다.
반대로, -EXPORT 형태로 저장했을 경우는 해당 MSSQL 버전의 특정 자료형에 구속되지 않기 때문에 다른 버전의 MSSQL에도
테이블로 로딩할 때 별 문제가 없습니다. (2005에서 만든 파일을 2000에도 로딩시킬 수 있음)
C. 파일에 특정한 보안 로직이나 권한 제한등이 없기 때문에 외부로 유출되었을 경우 누구나 DB에 로딩 시킬 수 있습니다.
관리상의 주의가 필요합니다. (보완해야할 대표적인 기능중에 1번째)
D. 데이터파일에 대한 압축 기능이 제공되지 않습니다. (보완해야할 대표적인 기능중에 2번째)
(MSSQL 2008 버전 부터는 지원하다는데.. 아직 접해보지는 못했음)
2. 알려진 사용상의 장점 MSSQL에서는 DTS 및 패키기 매니저, BCP등을 지원하는데 이렇게 떨궈진 파일들은 실제로 DB에 넣어놓기 전까지는
내부 구조가 어떻게 생겨먹었는지, 무슨 이유로 만들어졌는지, 어떤 데이터가 들어있는지 아무도 모르죠..
본 프로그램을 이용해서 저장할 경우는 -PRINT 기능을 이용하여, DB에 로딩하지 않고서도 아래와 같이 필요한 정보를 볼 수 있습니다.
파일이 생성된 시각, 만들어질 당시 접속한 데이터베이스, 유저명(암호는 당연히 기록되지 않음), 수행한 쿼리 및 대상 테이블
각 컬럼의 구조 정보, 필요에 의해 기술한 코멘트, 그리고 첫번째 로우의 데이터 정보를 출력해줍니다.
(하기사 이것때문에 만든것입니다. 장점은 흠.. -_-;;; 이게 다군요..)
하나더 라고 한다면, 흠.. 쓸만할 만큼은 충분히 빠릅니다. GUI 툴처럼 복잡하지도 않고, BCP 처럼 다양한 옵션을 지원하진 않지만.
성능하나만은 탁월하게 빠르다고 말씀드릴 수 있겠네요. 파일로 떨구는거나 테이블에 밀어 넣는거나... ^^;;;
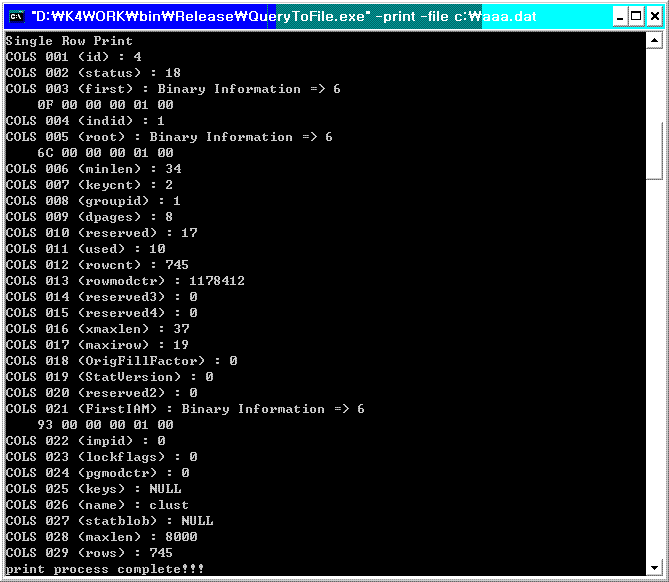
<이어진 화면>
위의 그림에서 처럼, 생성시 넣어준 정보와 간단한 디스크립션, 컬럼 정보 및 저장된 내용중 첫번째 데이터를 출력해 줍니다.
바이너리 및 이미지 데이터는 출력시 64바이트를 넘어가면 64바이트까지면 화면상에 출력해줍니다.
특별하게 설치할건 없고, 실행파일 하나와 DLL 두개로 구성되어 있어서 그냥 압축 풀고 사용하시면 됩니다.
<테스트환경: Windows 2003 Server 32Bit, Windows XP Home/Pro 32Bit, Windows Vista Home 32Bit, Windows 2008 Server 64Bit>
ODBC 프로그래밍을 하다보면, BLOB 타입 데이터를 처리할 때 자주 만나게 되는 에러이다.
예전에는 MS버그 려니, 하고 다음과 같은 방법으로 처리했었다.
1. 테이블을 설계할 때 BLOB 타입은 항상 마지막으로 몬다. BLOB 타입이 여러개라면 모두 뒤쪽으로 몰아서 사용한다.
2. ODBC는 때려치고, ADO나 OLEDB를 사용한다. (나는 ODBC를 꼭 써야하는 이유가 있으니 이 방법은 XXX 이다. -_-)
(사실 ADO는 쬐끔 써봤는데... OLEDB는 써본적이 한번도 없다..헐~)
위 두가지 방법이 인터넷 뒤져서 나온 해결법의 전부였다. MS포럼이나 KB 및 구글 뒤져바야
나오는게 그게 그거이다. MS에 문의해보니 안갈켜준다 -_-;;;
저 에러가 나오는 원인은 데이터 전송시 전송 효율을 올리기 위해서 미리 메모리를 할당해서 각
컬럼별로 바인딩 해놓고 패치하게 되는데, 크기 범위가 정해지지 않은 BLOB 데이터를 중간에
끼워넣게 되면 미리 준비된 메모리에 패치할 수 없기 때문이다.
(모든 프로토콜 분야에서 전송 성능은 상당히 중요한 이슈이다.)
이럴 경우 BLOB 영역은 0으로 리절브를 하게되고, 별도로 SQLGetData 를 이용해서 데이터를
가져오게 되는데....
이게 위치가 끝부분이 아니고, 중간부분에 가게되면 데이터 패치는 성공하지만, BLOB 데이터를
가져오려 하면 제목에 보이는 잘못된 인덱스 입니다 라는 에러가 발생한다.
한참 고민(3년간 사용하는 동안 -_-)하다가 문제의 원인을 추적해 보니, 패치하기 위하여 미리
메모리를 바인딩 해놓는 부분을 생략하고, 그 때 그 때 데이터를 SQLGetData 로 가져오는
방법을 생각해 봤다.
흠.. 잘나온다 -_-;;;
단, 미리 예비된 메모리에 덩어리로 패치하는게 아니기 때문에, 데이터 로우수가 많을 경우
위 방법을 사용하면 성능 저하가 발생할 수 있으므로, 사용상에 주의를 할 필요가 있다.
그나마 성능을 보전하기 위하여 머리를 굴려본걸 정리해 보면 다음과 같다.
1. 컬럼 정보를 읽어올 때 BLOB가 있는지 검사한다.
2. 모든 BLOB 컬럼이 뒤쪽에 몰려 있으면, 바인딩해서 리절브된 메모리에 패치하고, 나머지는 SQLGetData 로 긁어온다.
3. 중간에 BLOB 컬럼이 끼어있으면, 바인딩을 안하고 모든 컬럼을 SQLGetData 로 긁어온다.
이렇게 직접 구현하는 사람들이 많지 않겠지만, 그래도 혹시나 아직까지 쓰는 사람들이 있다면
조금이라도 도움이 되겠죠 ^^;;;
This is usually because you've missed the comment in INSTALL.W32. Your application must link against the same version of the Win32 C-Runtime against which your openssl libraries were linked. The default version for OpenSSL is /MD - "Multithreaded DLL".
If you are using Microsoft Visual C++'s IDE (Visual Studio), in many cases, your new project most likely defaulted to "Debug Singlethreaded" - /ML. This is NOT interchangeable with /MD and your program will crash, typically on the first BIO related read or write operation.
For each of the six possible link stage configurations within Win32, your application must link against the same by which OpenSSL was built. If you are using MS Visual C++ (Studio) this can be changed by:
 1. Select Settings... from the Project Menu.
 2. Select the C/C++ Tab.
 3. Select "Code Generation from the "Category" drop down list box
 4. Select the Appropriate library (see table below) from the "Use
    run-time library" drop down list box.  Perform this step for both
    your debug and release versions of your application (look at the
    top left of the settings panel to change between the two)
    Single Threaded           /ML        -  MS VC++ often defaults to
                                            this for the release
                                            version of a new project.
    Debug Single Threaded     /MLd       -  MS VC++ often defaults to
                                            this for the debug version
                                            of a new project.
    Multithreaded             /MT
    Debug Multithreaded       /MTd
    Multithreaded DLL         /MD        -  OpenSSL defaults to this.
    Debug Multithreaded DLL   /MDd
Note that debug and release libraries are NOT interchangeable. If you built OpenSSL with /MD your application must use /MD and cannot use /MDd.
As per 0.9.8 the above limitation is eliminated for .DLLs. OpenSSL .DLLs compiled with some specific run-time option [we insist on the default /MD] can be deployed with application compiled with different option or even different compiler. But there is a catch! Instead of re-compiling OpenSSL toolkit, as you would have to with prior versions, you have to compile small C snippet with compiler and/or options of your choice. The snippet gets installed as <install-root>/include/openssl/applink.c and should be either added to your application project or simply #include-d in one [and only one] of your application source files. Failure to link this shim module into your application manifests itself as fatal "no OPENSSL_Applink" run-time error. An explicit reminder is due that in this situation [mixing compiler options] it is as important to add CRYPTO_malloc_init prior first call to OpenSSL.
일단 저렇게 만들어서 컴파일을 해보니 out32dll.dbg 와 tmp32dll.dbg 처럼 디버깅용 폴더가 생기면서 필요한 파일이 작성됩니다.
그런데, 메뉴얼 대로 다 해서 소스와 물려 돌려봤는데, -_-??? 역시나 디버깅시 openssl 함수 호출부를 추적하면 내부로 못들어 가네요.
위에 꺼는 이전에 맨땅에 해딩하면서 만들었던 (0.9.8b 버전 당시..) 내용을 추려서, 0.9.8i 버전에 맞도록 수정한 내용입니다.
이렇게 수정해 놓고, 다시 몽땅지우고 재컴파일 한 후, 새로 생성된 라이브러리와 dll을 복사해놓고..
작업 프로그램을 빌드 한 후, 소스 추적에 들어가니 ssl 소스로도 잘 추적이 들어가네요..
수고하세요..
PS. 다 만들어진 라이브러리를 작업하는 프로젝트에 첨부하고 빌드했을 때, unresolved external symbol 류의 에러가 발생하면
ssleay32.def 에 해당 함수를 추가 하시면 됩니다. 참고로 ssleay32.def의 마지막 오디너리 넘버가 293번 이니까..
294번 부터 추가하세요.. 그리고, openssl 을 다시 한번 빌드하셔서 복사하시고 사용하시면 됩니다.
지금까지 0.9.8b 버전을 사용하다가, 추가된 cipher를 지원하기 위하여 0.9.8i 버전을 사용하게 되었습니다.
이거 받아서 컴파일 하다보니, 이전 버전과는 또 다른 문제가 튀어나오네요..ㅎㅎ;
이런 종류의 라이브러리 받아서 처음 컴파일하다보면 당황스런 경우가 많은데요 도움이 되셨으면 합니다.
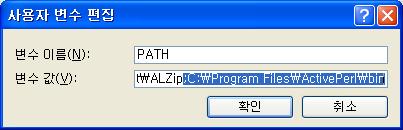
2. Perl 의 사용상 편의를 위해서 Perl의 설치 경로를 환경 변수에 등록해 주시면
지속적으로 사용하는데 아주 편합니다.
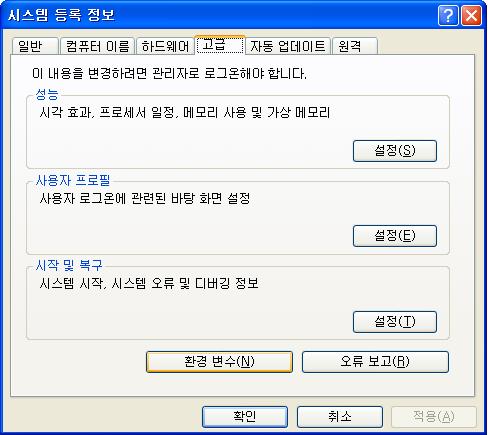
제어판->시스템->고급 탭을 선택합니다.
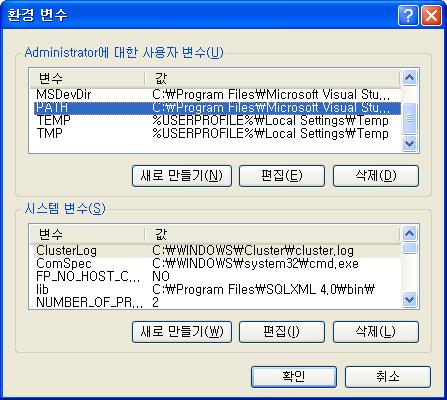
환경변수를 클릭한다.
편집을 클릭한다.
제일 끝에, 세미콜론을 하나 찍고, 펄의 bin 경로를 추가한다.
이렇게 되면 어떤 경로에서든 Perl을 바로 실행할 수 있다.
3. 다음으로 VC-WIN32 환경에서 컴파일 할수 있도록 컴파일 환경을 설정한다. => perl Configure VC-WIN32 --prefix=c:/some/openssl/dir
=> 위의 예에서 처럼 오픈SSL을 압축 풀어서 놓은 경로를 지정하여 환경을 설정한다.
4. 필요한 Makefile과 관련 오브젝트를 생성한다.
openssl의 경로로 가서, 콘솔창에 아래의 명령중에 하나를 입력한다.
별문제 없이 넘어가고 싶으면 ms\do_ms 를 추천한다.
=> masm 이 있으면 > ms\do_masm
=> nasm 이 있으면 > ms\do_nasm
=> 어셈블러 없으면> ms\do_ms
5. 이제 본격적으로 컴파일을 해보자.
=> nmake -f ms\ntdll.mak => 처음에 컴파일을 하면 제일 먼저 만나는 에러다, 에러 문구는 이것 저것 복잡한게 있지만 필요한 내용은 이거다.
.\crypto\cversion.c(105) : warning C4129: 'k' : unrecognized character escape sequence
=> 해당 파일을 소스를 에디트 할수 있는 툴을 이용하여 열어보자.
=> 저위에서 'k'는 프로그램의 설치경로에 따라 각각 다른 캐릭터로 나타날 수 있다.
대충 원인을 살펴보면, 프로그램(openssl) 설치 경로를 를 나타내는데 "가 앞뒤로 하나 더 붙어있어서 발생하는 문제이다.
아마도 윈도우와 유닉스의 경로 구분문자 차이 때문에 발생하는 것으로 추측된다.
이걸 잘 처리하고 컴파일을 다시 진행하면 다음과 같은 또다른 비슷한 유형의 에러를 만나게 된다.
.\crypto\x509\x509_def.c(65) : warning C4129: 'K' : unrecognized character escape sequence
=> 열심히 해당 파일을 열어서 살펴보자.
=> ./crypto/x509/x509_def.c
아래의 빨간색 항목을 주목하자, 윈도우즈에서는 저걸 프로그램 코드에 밖기 위해서는 역슬래시 두개로 바꾸어 주어야한다.
#ifndef OPENSSL_SYS_VMS
#define X509_CERT_AREA OPENSSLDIR
#define X509_CERT_DIR OPENSSLDIR "/certs"
#define X509_CERT_FILE OPENSSLDIR "/cert.pem"
#define X509_PRIVATE_DIR OPENSSLDIR "/private"
=> 자 다음과 같이 바꾸자 (웹에디터 때문인지, 글자 아래 밑줄이 보이는데 무시하자.)
#ifndef OPENSSL_SYS_VMS
#define X509_CERT_AREA OPENSSLDIR
#define X509_CERT_DIR OPENSSLDIR "\\certs"
#define X509_CERT_FILE OPENSSLDIR "\\cert.pem"
#define X509_PRIVATE_DIR OPENSSLDIR "\\private"
위에서 살펴보면 OPENSSLDIR 라는 디파인이 보인다. 이것도 무언지 살펴보면 또다른 문제가 나타난다.
=> ./crypto/opensslconf.h
=> 아래는 컴파일 환경설정 경로이기 때문에, 사용자 설치 경로에 따라 다를 수 있다. #if !(defined(VMS) || defined(__VMS)) /* VMS uses logical names instead */
#if defined(HEADER_CRYPTLIB_H) && !defined(OPENSSLDIR)
#define ENGINESDIR "D:\K4WORK\2_SRC_LIBRARY\k4lib_openss0.98i/lib/engines"
#define OPENSSLDIR "D:\K4WORK\2_SRC_LIBRARY\k4lib_openss0.98i/ssl"
#endif
이전에도 언급한적이 있지만, 역시나 VS에 물려서 디버깅은 않됩니다.. 그냥 돌아만 갈뿐...
아마도 이버전도 디버거에서 openssl 소스를 추적해 들어가려고 하면, ntdll.mak 파일을 수정해서
디버깅이 가능하도록 하는 버전과, release 에서 배포할 때 성능향상을 할 수 있도록 2가지 버전으로
모두 수정해서 처리해야 할거 같네요.
 WindowTerminal.zip
 익스플로러 보안설정 변경 | ActiveX/COM